Fitting a Saddle
Click on the image for a larger view.
If your saddle doesn't fit your horse properly then the horse gets hurt! This is a
simple and plain fact.
The longer the ill-fitting saddle is used the more hurt your horse feels. Often times riders don't realise they are
using an ill-fitting saddle and don't associate the signals a horse is giving with the fact that the horse is
getting a sore back because they are riding in a poorly fitting saddle.
When a horse experiences pain and discomfort from a poorly fitting saddle they show certain behavioural traits
like:
- moving away from you when you try to fit the saddle
- trying to nip the rider as the saddle is being fitted
- stamping the ground
- swishing their tail
An important point to remember is that a horse with a sore back will not only perform
poorly, but can be a dangerous thing to be on top of.
It is critical to you and your horse's health that your saddle fit your horse correctly.
Figure 1.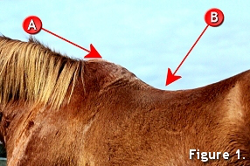
This picture shows a horse with a very high wither (A) and sway back (B) correctly fitting a saddle is especially
important in this case, due to the fact the weight of the saddle and the rider must be spread evenly across the
horses back.
Excessive weight concentrated on one spot is called a pressure point. This means that the weight of the rider is
not evenly distributed across the horses back, but concentrated on this point of pressure.
Figure 2.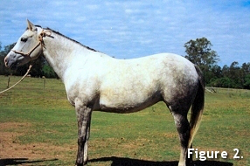
This picture shows a typical "Flat-Backed" Quarter Horse.
To correctly fit a saddle to this type of horse, you should not only pay attention to any pressure points that may
exist accross the bars of the tree, but you must also be able to draw a horizontal line from the top of the knee
pads to the top of the cantle. (see Figure 7)
If this imaginary line is not horizontal, then your weight will not be evenly distributed accross the bars of the
saddle tree.
Figure 3.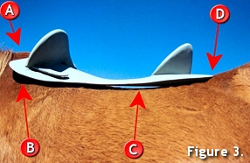
In this picture the top of the gullet is making contact with the wither (A). The bottom of the knee pad is sitting
well clear of the top of the shoulder (B). This means that the weight on the front of the tree is concentrated on
the pressure point touching the the wither (A). The clear light of day through the bars of the tree (C) means that
no weight at all will be spread across the horses back. The the rear flange (D) is talking all of the weight of the
rear of the tree causing an excessive amount of weight on the soft tissue of the flank.
Figure 4.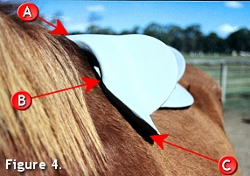
In this picture the gullet is touching the wither (A), the bottom of the gullet is also making contact with the top
of the shoulder (B) while the the end of the front flange is not making contact or sharing the weight of the front
of the tree (C). The problem with this tree is it is also too wide for this horses back.
As the tree is to wide for this horse, the gullet is touching the wither causing painful pressure. Make sure you
have at least 2 fingers width between the gullet and the wither.
Figure 5.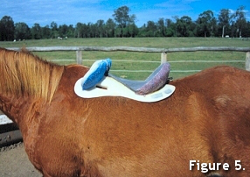
Close to a perfect fit.
You can see from this picture that the weight of the rider will be evenly distributed accross the horses back as
there is no pressure points.
Notice the nice "horizontal" line from the top of the knee pads to the top of the cantle, you can use the first
strand of fence wire in the background as the horizontal line.
Figure 6.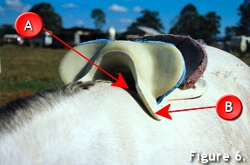
In this picture you can see that the saddle is fitting at the bottom (B) but is not touching the side of the wither
(A).
This will result in a pressure point at the bottom of the wither
Figure 7.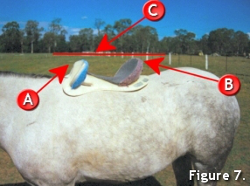
This picture shows a discrepancy between the height of the knee pads (A) and the height of the rear of the cantle
(B). This means the weight of the rider will be concentrated at the front of the saddle tree not evenly across the
length of the tree.
A correctly fitting saddle must provide a level line between point (A) and point (B).
(C) shows our "imaginary" horizontal line
| 


